SUNTEX RUBBER ENTERPRISE CO., LTD.

- Harmony
- Install wheels
- Introduction to the terms
- Overall balance
- Tips for installation
- Tire adjustment
Harmony
※Warning: Improper installation, insufficient tire pressure, and heavy load will damage the tire. The size of the tire and rim must be correct, and the pressure of the bead and rim should not exceed 40 psi to avoid bursting.
Install wheels
The vehicle manufacturer will indicate that changing the tire/wheel diameter or the axle ratio below 15% will not affect the ABS operation. Changing the tire/wheel diameter or the axle ratio exceeding 15% will affect the ABS operation and must be re-measured if the size is The correctness of the speedometer and the ABS action that can be maintained within the range are included in the vehicle maintenance manual. If you are installing dual tires, determine the difference in the diameter of the tires. The diameter difference of the dual tires should be within 1/4" (circumference is 3/4"). Check the gap between the tires. Refer to the tire or vehicle manufacturer's information , Specification table of minimum double tire clearance.
※Warning: If you need to use iron chains, pay attention to whether the gap between the two tires is sufficient to avoid iron chains from damaging the tires.
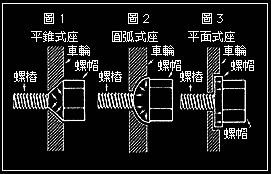
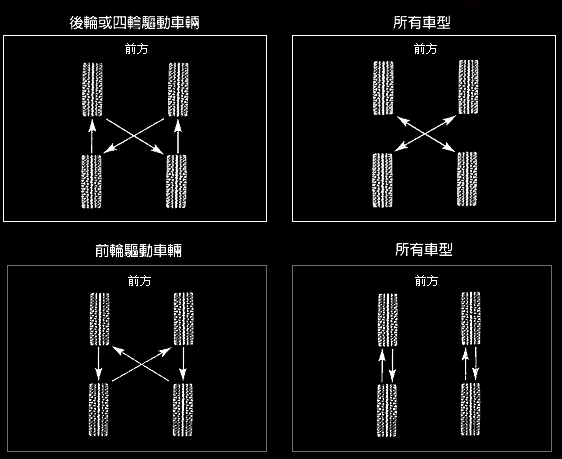
Before starting the installation, check the thread of the screw. The thread and the screw seat must be matched. There are three types of nut. The geometric plane of each nut and the wheel is different. There are flat cone seat, arc seat and flat seat. The three types of taper fitting and arc seat nut are tighter, because it will widen the screw, and the insufficient torque of the nut will cause loosening. If the torque of the locking nut is too large, it will cause fatigue and cause the screw hole to deform. Too much or insufficient torque will affect the normal rolling of the wheel. Flat Nuts usually use a washer, most of which are used in patented aluminum alloy wheels, because the aluminum alloy is too soft to resist frictional forces and are made into flat cone and arc-type nuts. Why is this criticism? Because the friction force acts on the washer and the wheel, only the pressure presses the wheel, it is extremely difficult to lock the flat nut. In the flat nut, if the torque is too large, the wheel will be deformed, which will cause the aluminum alloy and the washer contact part to protrude and deform. Therefore, it is very important to lock the wheel nut, once the torque is used improperly, the wheel will deform, so be very careful. Use a torque wrench to lock the nut. The nut is locked in a 4-hole, 6-hole and 8-hole nut locking method. If you use a 5-hole nut locking method as shown in the figure below, you must pay attention to the following Point:

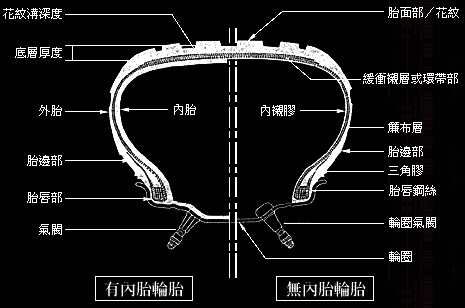
Introduction to the terms of each part of the wheel shot tire
Ply: A nylon or polyester cord woven with parallel fiber strands and covered with rubber.
Bead: The material between the tread and the lip of the tire.
Apex: The bead rubber body and the lower sidewall have a triangular structure with high hardness.
Bead wire: Seal and hold the rim to support the load.
Rim: A metal circle that supports the outer tire or the combination of outer tire and inner tube.
Bead lip: It is made of steel wire (electroplated in bronze) as the main body, and the outside is protected by rubber or cord and wrapped in the carcass ply, which is used to seat on the rim.
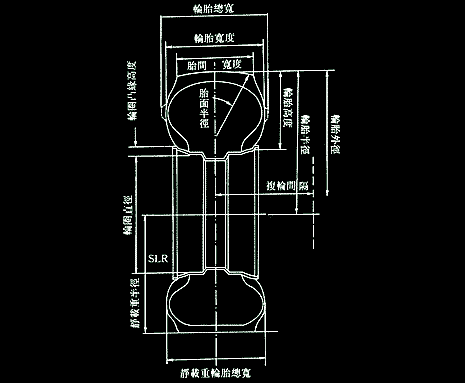
Tire radius: one-half of the outer diameter of the tire.
Total tire width: Under the above conditions, the maximum width of the tire, including lines and text.
Tire width: The total width of the tire minus the width of the grain and text.
Tire height: Tire outer diameter minus ring diameter ÷ 1/2 section height.
Tread width: The cross-sectional width of the largest shoulder part, generally refers to the width of the tread formed by the tread pattern.
Rim flange height: Refer to the definition in the rim chapter.
Rim diameter: It varies according to usage and type. This picture is a typical example. More detailed description is in the "Rim" chapter.
Static load radius: The distance from the tread surface to the center line of the tire axis when the tire is at rest and the vehicle's specified load is added.
Offset: The distance from the center line of the tire to the mounting surface of the rim, refer to the "offset" unit.
Double-wheel clearance: When the vehicle adopts double-wheeling, the distance between the two tires' bead closest to each other.
Grounding width/ length: The maximum width of the grounding surface perpendicular to the circumferential direction/ the maximum length of the circumferential direction.
Ground area: The area included in the ground width and length.
Tire nominal size and speed indication:
Nominal tire size
Truck, car tires
Imperial
10.00-20
-
10.00
-
20 inches
Oblique layer
-
-
Truck, car tires
Imperial
11.00R20
-
11.00
-
20 inches
R
-
-
Truck, car tires
Metric
185R14C
-
185
(80)
14 inches
R
-
-
Truck, car tires
Metric
315/80R22.5M
-
315
80
22.5 inches
R
-
M
Truck, car tires
Metric
165R13 82S
-
165
(80)
13 inches
R
82
S
Truck, car tires
Metric
205/70R14 94T
-
205
70
14 inches
R
94
T
Truck, car tires
Metric
185/65R14 85H
-
185
65
14 inches
R
85
H
Tire load index:
Load Index: The maximum load value that a tire can load under the specified maximum inflation pressure.
Tire speed indicator
(Maximum speed limit Km/h)
Speed indicator
Speed
F 80
G 90
J 100
K 110
L 120
M 130
N 140
P 150
Q 160
R 170
S 180
T 190
U 200
H 210
V 240
Overall balance
※Warning: Make sure that the counterweight installed on the inner side of the wheel will not affect the brakes or other parts. The counterweight must be installed in the correct position, and the wheels can be installed as long as the wheels are balanced.
Tips for installation
Some notices while installing:
Tire adjustment
Pay attention to the following points when the tire needs to be adjusted: